2022. 8. 30. 20:22ㆍProjects/Charon
오랜만에 다시 포스팅을 올리네요. 그동안 다른 교육 프로그램을 듣는다고 바빠서 카론 개발을 못 했습니다.
FPS 게임 개발은 처음 진행해봤는데, 어릴 때 카운터스트라이크 온라인 좀비 시나리오 모드를 좋아했던 기억을 되살려 재미있게 만들었던 것 같습니다. 나중에 기획을 제대로 해서 사이드 프로젝트로 하나 진행해보고 싶네요. 멀티 플레이도 된다면 금상첨화겠지만 그거까지 하려면 갈 길이 굉장히 멀 것 같습니다.ㅎㅎㅎ...
잡담은 여기까지 하도록 하고, 저번 글에서는 이동 애니메이션 싱크 맞추는 것까지 했었죠?
평지에서는 아무런 문제가 없었지만 계단과 같은 경사 지형인 경우에는 수많은 문제가 발생했었습니다. 그래서 손을 봐야할 내용들이 좀 굉장히 많았어요. 그래도 하나하나 찾아보며 공부했기에 나름 의미있는 시간이 아니었나 싶습니다.
버그를 거의 다 해결하고 난 뒤에 든 생각이지만, 이 게임에서는 Rigidbody가 아니라 Character Controller를 쓰는 것이 차라리 더 나았을 것 같다는 생각이 드네요...ㅎㅎ,, 그래도 이왕 만든 거 계속 해보죠.
그럼 이제부터 어떠한 버그들이 있었는지 하나하나씩 살펴보도록 하겠습니다.
☢️발생한 문제들
첫 번째 | 평평한 지면에서 경사로로 오를 때, 키 입력을 떼면 위로 튀어오르던 버그
이 문제를 야기한 건 바로 다음 코드였습니다.
rigidBody.velocity = direction * currentMoveSpeed + Vector3.up * rigidBody.velocity.y;
경사로를 오를 때에는 rigidBody.velocity.y가 양수가 되기 때문에 위 쪽으로 벡터 힘이 더해져서 나타난 결과라고 볼 수 있지요.
두 번째 | 캐릭터가 경사로에서 내려 올 때, 퉁퉁 튕기며 내려오는 버그
이것은 이동 방향 벡터에 중력 벡터가 더해졌기 때문에 발생한 결과입니다. 이동할 방향을 평면 쪽으로 투영시키는 과정이 필요하겠습니다. 물론 이와 같은 로직을 원하는 게임도 있을 테지만, 우리 게임에서는 아니기에 수정해줘야 합니다.
세 번째 | 캐릭터가 경사로에 가만히 서 있을 때, 서서히 미끄러져 내려오는 버그
마찰력 문제를 생각해볼 수 있겠으나, PhysicsMaterial의 Static Friction을 최대로 줘봐도 똑같이 적용되더라구요.
이것 역시 중력과 Vector3.up * rigidBody.velocity.y의 힘에 의해 발생하는 버그라고 볼 수 있겠습니다.
네 번째 | 캐릭터가 경사로에 오를 때와 내려올 때 속도가 달라지는 버그
이것은 현실 세계에서는 당연한 법칙이지만, 게임 플레이를 할 때 불편하게 작용할 수 있으므로 수정해줘야 할 것 같습니다.
다섯 번째 | 상식적으로 올라갈 수 없는 경사 각도인데도 캐릭터가 올라갈 수 있었던 버그
사실상 제일 난감한 버그였습니다. 사실상 아직도 원인 파악을 정확하게는 하지 못한 것 같습니다.
이것도 문제가 될 수 있으니, 막아주도록 하겠습니다. 그렇다면 이제 문제를 차근차근 해결해 보도록 하겠습니다.
✅해결 과정
경사(Slope) 지형 체크하기
캐릭터가 평지에 있는지, 경사로에 있는지 판단하는 것은 Raycast를 아래로 쏘아 부딪힌 평면의 법선 벡터(Normal)을 알아내고, 이 법선 벡터와 Vector3.up 벡터 사이의 각도로 판별할 수 있습니다.
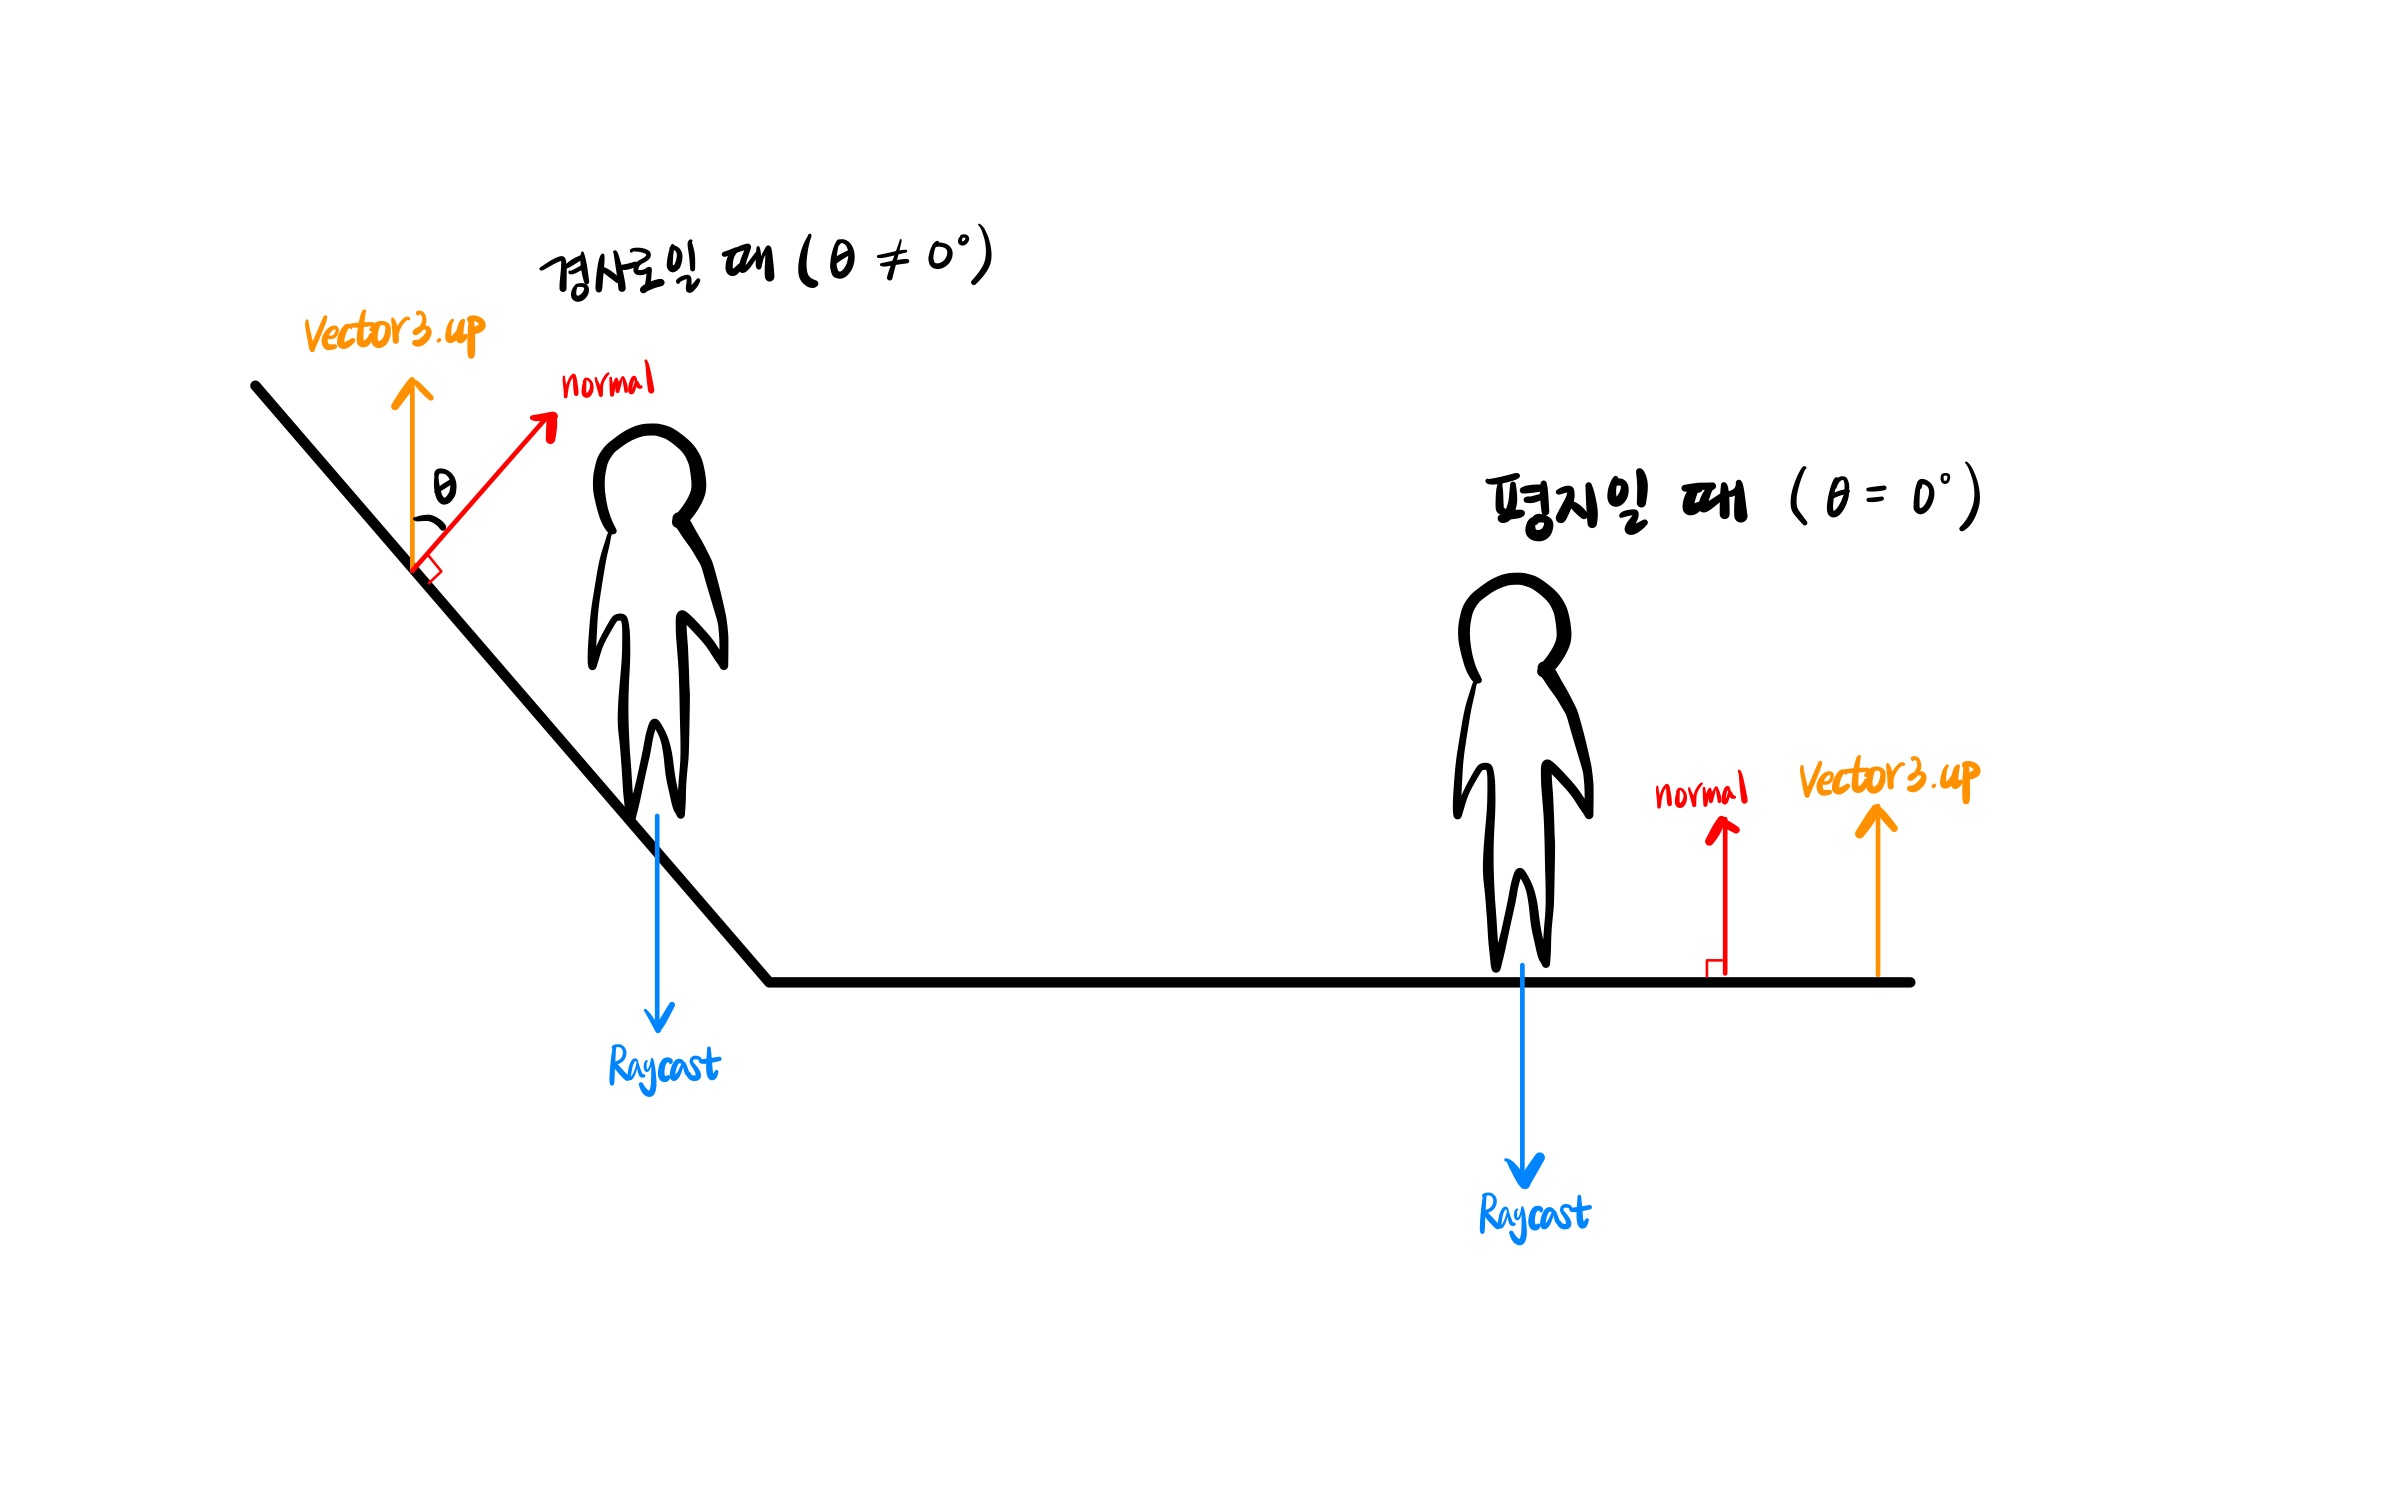
이 원리를 적용하여 현재 캐릭터가 경사 지형에 있는지 아닌지를 판별해주는 함수를 만들었습니다.
개인적으로 Raycast와 같은 부류의 메소드들을 사용하기 어려웠는데, 이번 기회에 연습을 좀 할 수 있었던 것 같습니다.
private const float RAY_DISTANCE = 2f;
private RaycastHit slopeHit;
private int groundLayer = 1 << LayerMask.NameToLayer("Ground");  // 땅(Ground) 레이어만 체크

public bool IsOnSlope()
{
    Ray ray = new Ray(transform.position, Vector3.down);
    if(Physics.Raycast(ray, out slopeHit, RAY_DISTANCE, groundLayer))
    {
        var angle = Vector3.Angle(Vector3.up, slopeHit.normal);
        return angle != 0f && angle < maxSlopeAngle;
    }
    return false;
}
경사 지형 평면에 맞게 이동 방향 벡터 투영하기
이제 경사 지형인지 아닌지를 판단할 수 있게 되었으니 만약 경사 지형이라면, 현재 캐릭터가 서 있는 경사 지형 평면 벡터로 이동 방향 벡터를 투영하는 작업을 해줘야 합니다. 그래야 캐릭터가 경사 지형에서 내려갈 때 통통 튀지 않고 내려갈 수 있어요.

Vector3에서 제공하는 ProjectOnPlane() 메소드를 활용하면 쉽게 구할 수 있습니다. 또한, 투영된 벡터 방향 정보만 필요한 것이므로 정규화(normalized)를 해주었습니다.
protected Vector3 AdjustDirectionToSlope(Vector3 direction)
{
    return Vector3.ProjectOnPlane(direction, slopeHit.normal).normalized;
}
이 때까지 한 것들을 통해, 경사 지형에서 통통 튀며 내려오던 버그를 수정해 주었습니다.
protected void Move()
{
    float currentMoveSpeed = player.MoveSpeed * CONVERT_UNIT_VALUE;
    float animationPlaySpeed = DEFAULT_ANIMATION_PLAYSPEED +
                               GetAnimationSyncWithMovement(currentMoveSpeed);

    // ---------추가-----------
    bool isOnSlope = IsOnSlope();
    Vector3 velocity = isOnSlope ? AdjustDirectionToSlope(Vector3 direction) : direction;
    Vector3 gravity = isOnSlope ? Vector3.zero : Vector3.down * Mathf.Abs(rigidBody.velocity.y);
    // ------------------------
    LookAt();
    rigidBody.velocity = velocity * currentMoveSpeed + gravity;
    animator.SetFloat("Velocity", animationPlaySpeed);
}
추가로, 첫 번째 버그였던 지형 → 경사 지형 이동 시 위로 튀던 버그도 수정해주었습니다.
Vector3 gravity = isOnSlope ? Vector3.zero : Vector3.down * Mathf.Abs(rigidBody.velocity.y);
위에 작성한 코드들은 이렇게 사용한다는 예시를 보여드린 것일 뿐, 모든 버그들을 해결한 코드가 아닙니다.
다음으로 이동하여 또 하나하나 차근차근 해결해 보겠습니다.
땅(Ground)에 붙어 있는지 체크하기
이제 경사 지형에 서 있을 때, 서서히 미끄러져 내려오던 버그를 수정할 겁니다. 경사 지형일 때와 아닐 때를 구별하여 따로 적용해주면 되는데, 두 가지 방법이 있습니다.
- Rigidbody의 Freeze Position Y 을 체크/해제 하는 방식
- Rigidbody의 Use Gravity 을 체크/해제 하는 방식
저는 두 번째 방법을 선택했습니다. 그런데 이거랑 땅에 붙어 있는지 체크하는 것은 무슨 상관이냐구요? 캐릭터가 바닥과 경사 지형을 따라 이동하기만 하면 사실상 필요 없습니다. 문제는 공중에서 떨어지는 상황이지요.
이미 경사 지형 체크용으로 사용하던 Raycast를 재활용하자니, Raycast의 길이 때문에 공중에 뜬 상태로 다니게 되는 문제가 발생합니다. 콜라이더의 OnCollisionEnter() 메소드도 경사 지형에서 그닥 좋은 모습을 보여주진 못했습니다.
그래서 새로운 Raycast를 쓰자니, Raycast는 특정 상황에서는 땅 체크를 하지 못합니다.
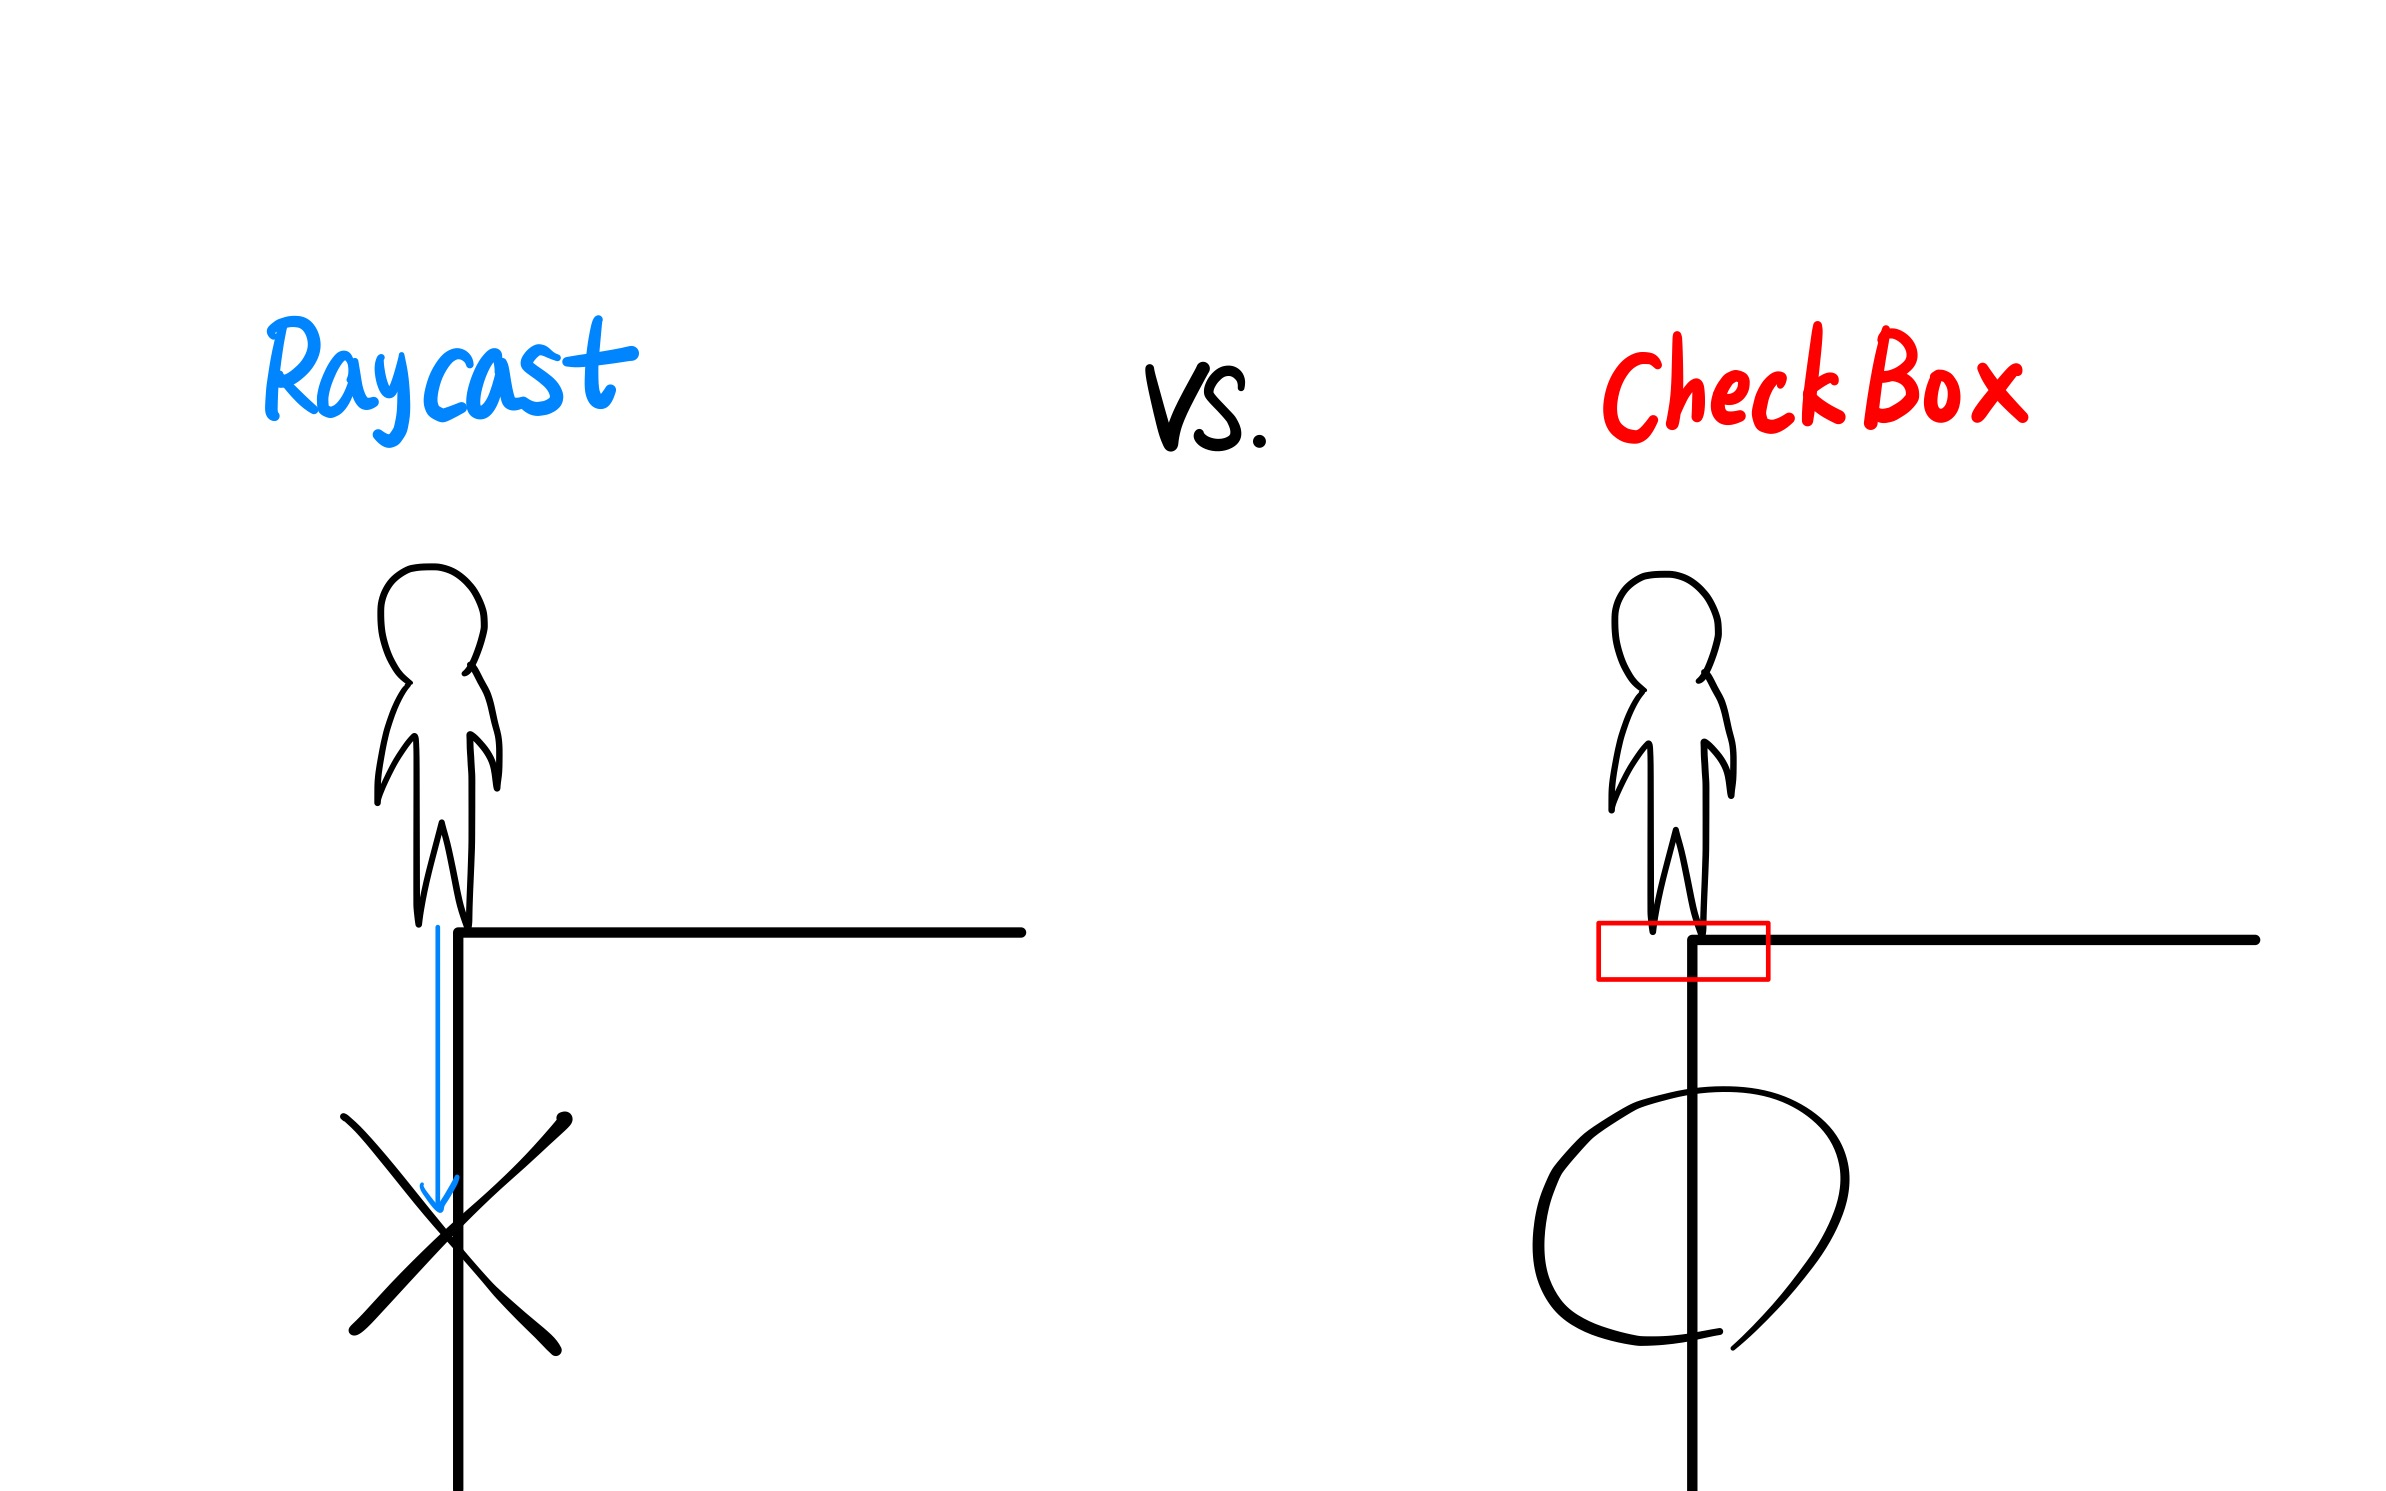
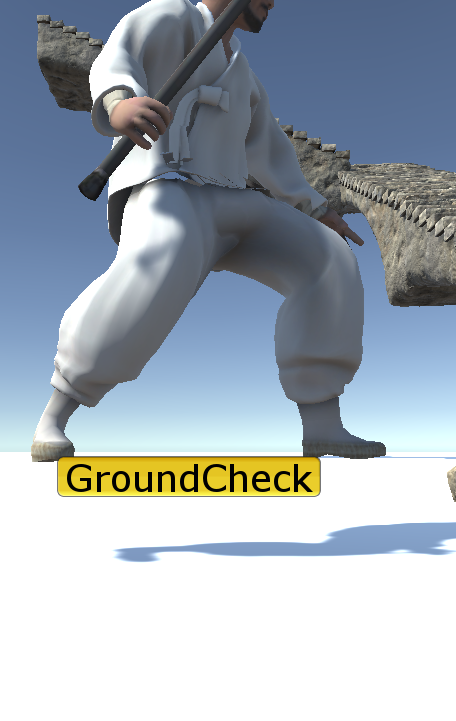
그래서 저는 부딪힌 대상에 대한 정보는 필요없고, 단지 넓은 면적으로 체크만 효율적으로 할 수 있으면 되는 Physics.CheckBox()를 이용했습니다. 우선 캐릭터 오브젝트의 하위 빈 오브젝트로 "GroundCheck"를 만들어 주었습니다.
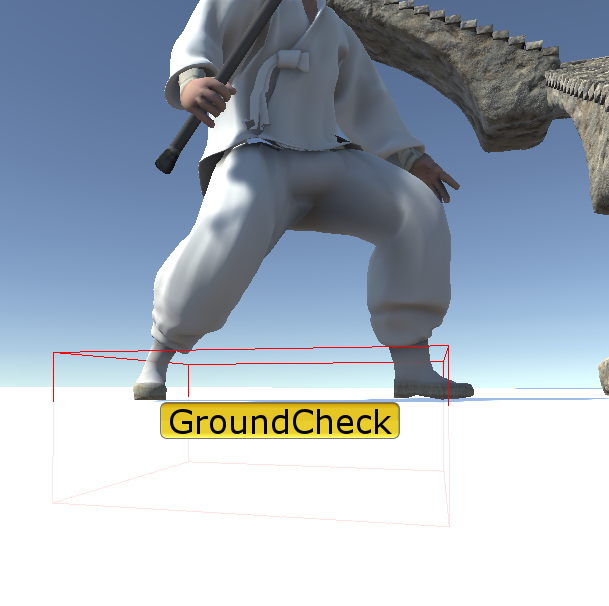
그리고 캐릭터의 크기에 맞춰서 CheckBox 크기가 유동적으로 변할 수 있되, Y축은 조금 작게 세팅해주었습니다.
[SerializeField] Transform groundCheck;

public bool IsGrounded()
{
    Vector3 boxSize = new Vector3(transform.lossyScale.x, 0.4f, transform.lossyScale.z);
    return Physics.CheckBox(groundCheck.position, boxSize, Quaternion.identity, groundLayer);
}

// Quaternion.identity는 회전값이 없다는 의미입니다.
시각적으로 그려서 한 번 보여드리면 다음과 같습니다.
private void OnDrawGizmos()
{
    Gizmos.color = Color.red;
    Vector3 boxSize = new Vector3(transform.lossyScale.x, 0.4f, transform.lossyScale.z);
    Gizmos.DrawWireCube(groundCheck.position, boxSize);
}
이제 원활한 땅 체크를 할 수 있게 되었네요. 이것을 토대로 코드를 수정하여 주면, 경사 지형에서 미끄러져 내려가던 버그를 고칠 수 있습니다. 경사 지형에서 중력을 꺼주니, 올라갈 때와 내려갈 때 속도가 달라지는 문제도 해결되겠네요.
protected void Move()
{
    float currentMoveSpeed = player.MoveSpeed * CONVERT_UNIT_VALUE;
    float animationPlaySpeed = DEFAULT_ANIMATION_PLAYSPEED +
                               GetAnimationSyncWithMovement(currentMoveSpeed);

    //-----------------수정----------------------------------
    bool isOnSlope = IsOnSlope();
    bool isGrounded = IsGrounded();
    Vector3 velocity = direction;
    Vector3 gravity = Vector3.down * Mathf.Abs(rigidBody.velocity.y);

    if (isGrounded && isOnSlope)         // 경사로에 있을 때
    {
        velocity = AdjustDirectionToSlope(direction);
        gravity = Vector3.zero;
        rigidBody.useGravity = false;
    }
    else
    {
        rigidBody.useGravity = true;
    }
    //-------------------------------------------------------

    LookAt();
    rigidBody.velocity = velocity * currentMoveSpeed + gravity;
    animator.SetFloat("Velocity", animationPlaySpeed);
}
갈 수 있는 지형인지 아닌지 체크하기
이제 마지막 버그만 남았네요. 오를 수 없는 경사 지형인데도 불구하고 키 입력을 계속 주면 올라가는 버그였습니다.
중력값을 더 늘리면 힘이 딸려서 못 올라가긴 했지만, 그렇게 하면 작은 방지턱 하나조차 못 넘더라구요.
그래서 다음 프레임에 이동할 위치를 먼저 계산한 후, 거기에서 새로운 Raycast를 아래로 쏘아 이동하기 전에 판단하는 걸로 해결 방안을 마련했습니다.
우선 캐릭터가 바라보는 정면 쪽으로, 콜라이더 가장 외곽에 "RaycastOrigin"이라는 빈 오브젝트를 자식으로 생성해주었습니다. 이동하는 캐릭터 오브젝트 좌표는 캐릭터 중심쪽이지만, 콜라이더 반지름을 생각해야 하기 때문이죠.
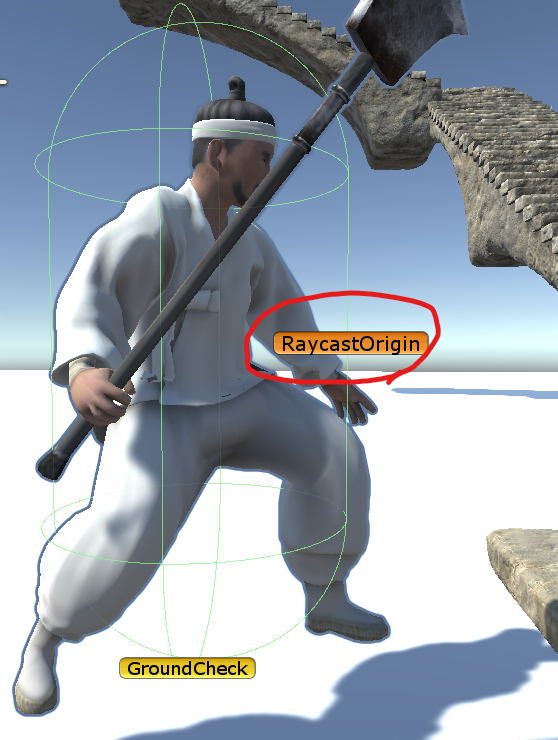
여기에서 이동할 방향 * 이동속도 * Time.fixedDeltaTime 벡터를 더해주면 다음 프레임에서의 캐릭터 맨 앞 위치가 되겠지요. 저는 Move()를 FixedUpdate() 함수에서 구동 중이기 때문에 Time.fixedDeltaTime을 사용했습니다.
아무튼 다음 프레임 캐릭터 위치에서 아래로 Raycast를 쏘아, 닿은 평면의 법선 벡터와 Vector3.up 벡터 사이의 각도를 계산합니다.
private float CalculateNextFrameGroundAngle(float moveSpeed)
{
    // 다음 프레임 캐릭터 앞 부분 위치
    var nextFramePlayerPosition =
                       raycastOrigin.position + direction * moveSpeed * Time.fixedDeltaTime;

    if (Physics.Raycast(nextFramePlayerPosition, Vector3.down, out RaycastHit hitInfo,
                        RAY_DISTANCE, groundLayer))
        return Vector3.Angle(Vector3.up, hitInfo.normal);
    return 0f;
}
그리고 이게 maxSlopeAngle로 설정한 값보다 클 때는 velocity를 Vector3.zero로 설정하여 이동하지 못하도록 하게 합니다.
protected void Move()
{
    float currentMoveSpeed = player.MoveSpeed * CONVERT_UNIT_VALUE;
    float animationPlaySpeed = DEFAULT_ANIMATION_PLAYSPEED +
                               GetAnimationSyncWithMovement(currentMoveSpeed);
    bool isOnSlope = IsOnSlope();
    bool isGrounded = IsGrounded();

    //----------------수정-----------------
    Vector3 velocity = CalculateNextFrameGroundAngle(currentMoveSpeed) < maxSlopeAngle ?
                       direction : Vector3.zero;
    //-------------------------------------
    Vector3 gravity = Vector3.down * Mathf.Abs(rigidBody.velocity.y);

    if (isGrounded && isOnSlope)
    {
        velocity = AdjustDirectionToSlope(direction);
        gravity = Vector3.zero;
        rigidBody.useGravity = false;
    }
    else
    {
        rigidBody.useGravity = true;
    }

    LookAt();
    rigidBody.velocity = velocity * currentMoveSpeed + gravity;
    animator.SetFloat("Velocity", animationPlaySpeed);
}
최대 경사 각도(maxSlopeAngle)을 40도로 해놓고 테스트 해보겠습니다.
테스트 해보니 잘 작동하는 것을 볼 수 있습니다. 추가로, 바닥에 있는 방지턱이나 계단 높이에 대해서도 오를 수 있는지 없는지를 구현할 수 있는데 저는 거기까지는 필요 없을 것 같아 구현하지 않겠습니다. 필요하시면 🔗이 영상을 참고하면 좋을 것 같네요.
마무리
3D 물리가 이렇게나 힘들고 어려운 줄은 꿈에도 몰랐습니다. 꽤나 고생을 좀 했네요... 이것저것 많이 찾아보며 공부했던 것 같습니다. 다음에는 어떤 난관이 저를 고통스럽게 할까요...ㅎㅎㅎ 긴 글 읽어주셔서 감사합니다. 전체 소스코드 필요하신 분은 아래에 남겨 놓을게요.
using System;
using System.Collections;
using System.Collections.Generic;
using UnityEngine;
using UnityEngine.InputSystem;
[RequireComponent(typeof(Player))]
public class PlayerController : MonoBehaviour
{
#region #기본 컴포넌트
public Vector3 direction { get; private set; }
protected Player player;
protected Rigidbody rigidBody;
protected Animator animator;
protected CapsuleCollider capsuleCollider;
#endregion
#region #이동 관련 변수
protected const float CONVERT_UNIT_VALUE = 0.01f;
protected const float DEFAULT_CONVERT_MOVESPEED = 3f;
protected const float DEFAULT_ANIMATION_PLAYSPEED = 0.9f;
protected float frontGroundHeight;
#endregion
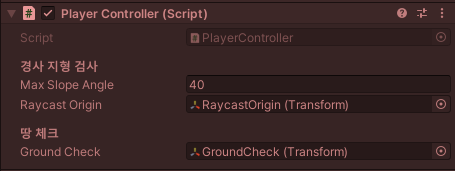
#region #경사 체크 변수
[Header("경사 지형 검사")]
[SerializeField, Tooltip("캐릭터가 등반할 수 있는 최대 경사 각도입니다.")]
float maxSlopeAngle;
[SerializeField, Tooltip("경사 지형을 체크할 Raycast 발사 시작 지점입니다.")]
Transform raycastOrigin;
private const float RAY_DISTANCE = 2f;
private RaycastHit slopeHit;
#endregion
#region #바닥 체크 변수
[Header("땅 체크")]
[SerializeField, Tooltip("캐릭터가 땅에 붙어 있는지 확인하기 위한 CheckBox 시작 지점입니다.")]
Transform groundCheck;
private int groundLayer;
#endregion
#region #UNITY_FUNCTIONS
void Start()
{
rigidBody = GetComponent<Rigidbody>();
animator = GetComponent<Animator>();
player = GetComponent<Player>();
capsuleCollider = GetComponent<CapsuleCollider>();
groundLayer = 1 << LayerMask.NameToLayer("Ground");
}
void FixedUpdate()
{
Move();
}
#endregion
private float CalculateNextFrameGroundAngle(float moveSpeed)
{
var nextFramePlayerPosition = raycastOrigin.position + direction * moveSpeed * Time.fixedDeltaTime; // 다음 프레임 캐릭터 앞 부분 위치
if (Physics.Raycast(nextFramePlayerPosition, Vector3.down, out RaycastHit hitInfo, RAY_DISTANCE, groundLayer))
{
return Vector3.Angle(Vector3.up, hitInfo.normal);
}
return 0f;
}
protected void Move()
{
float currentMoveSpeed = player.MoveSpeed * CONVERT_UNIT_VALUE;
float animationPlaySpeed = DEFAULT_ANIMATION_PLAYSPEED + GetAnimationSyncWithMovement(currentMoveSpeed);
bool isOnSlope = IsOnSlope();
bool isGrounded = IsGrounded();
Vector3 velocity = CalculateNextFrameGroundAngle(currentMoveSpeed) < maxSlopeAngle ? direction : Vector3.zero;
Vector3 gravity = Vector3.down * Mathf.Abs(rigidBody.velocity.y);
if (isGrounded && isOnSlope) // 경사로에 있을 때
{
velocity = AdjustDirectionToSlope(direction);
gravity = Vector3.zero;
rigidBody.useGravity = false;
}
else
{
rigidBody.useGravity = true;
}
LookAt();
rigidBody.velocity = velocity * currentMoveSpeed + gravity;
animator.SetFloat("Velocity", animationPlaySpeed);
}
public bool IsGrounded()
{
Vector3 boxSize = new Vector3(transform.lossyScale.x, 0.4f, transform.lossyScale.z);
return Physics.CheckBox(groundCheck.position, boxSize, Quaternion.identity, groundLayer);
}
public bool IsOnSlope()
{
Ray ray = new Ray(transform.position, Vector3.down);
if(Physics.Raycast(ray, out slopeHit, RAY_DISTANCE, groundLayer))
{
var angle = Vector3.Angle(Vector3.up, slopeHit.normal);
return angle != 0f && angle < maxSlopeAngle;
}
return false;
}
public void OnMoveInput(InputAction.CallbackContext context)
{
Vector2 input = context.ReadValue<Vector2>();
direction = new Vector3(input.x, 0f, input.y);
}
protected void LookAt()
{
if (direction != Vector3.zero)
{
Quaternion targetAngle = Quaternion.LookRotation(direction);
rigidBody.rotation = targetAngle;
}
}
protected float GetAnimationSyncWithMovement(float changedMoveSpeed)
{
if (direction == Vector3.zero)
{
return -DEFAULT_ANIMATION_PLAYSPEED;
}
// (바뀐 이동 속도 - 기본 이동속도) * 0.1f
return (changedMoveSpeed - DEFAULT_CONVERT_MOVESPEED) * 0.1f;
}
protected Vector3 AdjustDirectionToSlope(Vector3 direction)
{
Vector3 adjustVelocityDirection = Vector3.ProjectOnPlane(direction, slopeHit.normal).normalized;
return adjustVelocityDirection;
}
}
'Projects > Charon' 카테고리의 다른 글
| [Charon] #6. 휴머노이드 애니메이션 수정과 무기 탈장착 시스템 기반 만들기 (1) | 2022.10.05 |
|---|---|
| [Charon] #5. 상태 패턴(State Pattern) 도입하기 (4) | 2022.10.04 |
| [Charon] #4. RigidBody를 이용한 3D 캐릭터 N단 대시(Dash) 구현하기 (4) | 2022.09.21 |
| [Charon] #2. 이동 애니메이션(Move Animation) 적용 및 싱크(Sync) 맞추기 (0) | 2022.08.18 |
| [Charon] #1. New Input System을 적용하여 플레이어 이동 구현하기 (8) | 2022.08.17 |